
WISEflow for TPOs

Click on the links below to access FAQs and WISEflow resources for TPOs and flow Managers:

Activating the flow

In order for students and most other users to be able to participate in flows, they need to be activated. Click on 'activate flow' once all details for the assignment/ exam have been checked:

activate flow

Your department may have their own checklist to follow for this, but it can also be helpful to click "Summarise flow" and get an overview of some of the flow's settings:

summarise flow 1

summarise flow 2

Adding additional material (General material for students and marker notes)

Additional material intended to be seen by students can be added to a flow via the "To be handed out" tab:

additional or general material

Note: anything you add to the flow as additional or general material can be seen by students as soon as the flow is activated, even if the participant start date/ time has not been reached yet (this makes it an ideal area to include information which should be read ahead of submitting). It is normally best to add any files or links as general material as this can be viewed by both staff and students. 

Material that should specifically be shared with staff (e.g. moderation forms) can be attached via the "Assessment and review" panel in the same way by clicking "Manage material":

additional material for staff

Adding assignments and exams

Academic users may ask you to attach a coursework brief or exam paper to a flow if they are unable to do this themselves (either because they don't have Author permissions or because the participation period has started). For FLOWassign, FLOWhandin and FLOWlock flow types, they may provide you with a PDF file, or alternatively an 8 digit reference code for FLOWmulti. 

Assignments can be attached to a flow via the "To be handed out" tab:

adding assignments

By default, the first assignment you create will be distributed to all students on the flow - however, if needed you can add multiple assignments by clicking "+Create new assignment":

adding assignments 2

Different assignments can then be distributed to specific students by using the assignment distribution table below:

adding assignments 3The features here work in exactly the same way as the table which is used to allocate markers to students. See Adding Assessors (markers) and Reviewers for more information.

Adding Assessors (markers) and Reviewers

Any member of staff who is required to enter and submit grades and deliver feedback in WISEflow should be added to the flow as an Assessor. Reviewers are more nuanced, but effectively this role is normally suitable for anybody who may require read-access to student submissions, or anybody who should be able to comment on scripts but does not necessarily need a requirement to enter grades (e.g. a moderator or an external examiner). 

Assessors and Reviewers can be added to a flow via the "Assessment and review" panel:

add assessor 1

Simply click "+Add assessor" or "+Add reviewer" on the screen that follows and search for the individuals by name. Tick the box to select the individual and then click "Save":

add assessor 2

Reviewers have access to all student scripts by default, but Assessors will need to have specific students allocated to them for marking.

Methods of allocating Assessors
    1. Allocate an Assessor to all students by simply clicking the middle button in the "Actions" column:
      allocate all students to an assessor
      This is the fastest way to allocate an Assessor and is useful when there is a single person marking the entire cohort, but this should not be used to allocate multiple markers unless the submissions need to be double marked. 

    2. Quick allocation, which can be selected from the "Work distribution" table just underneath the area where Assessors are added:
      the quick allocation button
      Here you can rapidly allocate multiple markers based on a specified share of the workload (e.g. marker 1 should mark 60% of scripts, marker 2 will look at the remaining 40%). Make sure you select "Allocate as work distribution" otherwise some students may be unintentionally double marked:
      the quick allocation menu

    3. Using the allocation matrix, which can also be selected from the "Work distribution" table:
      the allocation matrix button
      This is most useful when Assessors must be allocated to specific students (e.g. if the work should be marked by the student's personal tutor). Simply click the cell where the appropriate student and Assessor intersect to allocate the marking:
      the allocation matrix
      You can also use the keyboard shortcuts "A" and "D" to add and delete allocations respectively. Further, there are options to import and export Excel compatible templates of the allocation matrix so that this can be completed offline/ outside of WISEflow and then reuploaded later on:
      options to import/ export a spreadsheet in the allocation matrix

    4. Allocations can also be adjusted directly in the "Work distribution" table by clicking on the relevant Assessor's name in any given row:
      allocating students directly via the work distribution table
      This is not the fastest way to allocate large volumes of marking, but can be useful where a quick change is needed.

Note: Assessor allocations cannot be changed once a grade has been submitted for a student, which is denoted by a closed padlock symbol in the "Work distribution" table (options to change the allocation may also be greyed out):

a submitted grade in the work distribution table

Adding other Managers and staff

Staff can be added to flows in several roles via the "Associates" tab on a flow:

adding staff

Here you can add users in the following roles:

  • Author (allows an academic to attach a coursework brief, exam paper or rubric to a flow within a deadline)
  • Invigilator (allows staff to monitor the progress of students during an exam, as well as send announcements via direct message. Head invigilators are additionally permitted to extend time for students and make comments via the flow monitor)
  • Manager (allows other staff to edit/ manage the administration of the flow. It is good practice to add two other administrators at minimum to a flow so that this can be managed in your absence, though your College's practice may require more than this)

Click "+Add author", "+Add invigilator" or "+Add manager", search for a user by name and then click "Add":

adding staff 2

Continue searching for users and adding them as desired, then click "Save" to finish. For information on adding other members of staff to a flow such as markers, moderators and external examiners, see Adding Assessors (markers) and Reviewers.

Adding rubrics

Academic users may ask you to attach a rubric to a flow if they are unable to do this themselves (either because they don't have Author permissions or because the assessment period has started). You can add a rubric to every flow type except FLOWmulti. 

The academic should have provided you with the reference code for the rubric, either via email or by sharing the rubric with you on WISEflow. The correct reference code should be a string of 8 letters and numbers separated by a dash, e.g. A91P-HGUR. If the code received is not in this format, it is incorrect and you will need to request the appropriate code. 

To add the code to a flow click the "Set up rubric" button on the main flow page, found under the "Assessment and review" panel:

Manageraddrubric1

On the screen that follows, simply copy and paste the reference code into the input field and click "Attach":

Manageraddrubric2

If the rubric has been shared with you on WISEflow, you can also click on the spyglass button next to this input field to search for it and attach it that way instead:

Manageraddrubric3

Manageraddrubric4

The successfully attached rubric will now be displayed, along with options to enforce mark conversion (i.e. the academic is forced to submit the grade calculated by the rubric, generally not used) and to decide whether the completed rubrics are automatically shared with the students at the end of the assessment period:

Manageraddrubric5

If mark conversion that matches the current assessment type was built into the rubric, this will be added in automatically. If no appropriate mark conversion exists, you will still have the opportunity to add this manually:

Addmarkconversion1

See Adding mark conversion to a rubric for more information. Depending on the assignment there may not be a need for this feature, so always check with the academic before manually adding mark conversion.

Adding mark conversion to a rubric

If a rubric didn't have mark conversion built into it before it was added to a flow and this is needed, it can still be added in retroactively. After adding the rubric to the flow, click "Add a mark converter":

add mark converter

On the mini menu that appears, you will be able to set up the mark conversion based on what assessment type is in use for the flow. If this involves letter grades or a pass/ fail assignment, for example, you will be able to adjust the grade boundaries in accordance with University policy:

add mark converter 2

If the flow requires percentage grades to be entered, no adjustments will be needed. Once you've finished, simply click "Save" to complete the process. With mark conversion added on, the rubric will now automatically calculate a grade when used (which academics can still manually adjust as needed). 

Adding sources

Sources are primarily used to add students to flows. A source can be added to a flow in two different ways. You can add a source when you first create a flow, or you can choose to create a flow with no source selected and add this information in later.

Adding a source when creating a flow

 A source of information can be selected from the dropdown menu on the flow creation page (see Source types for more information): 

create flow sources

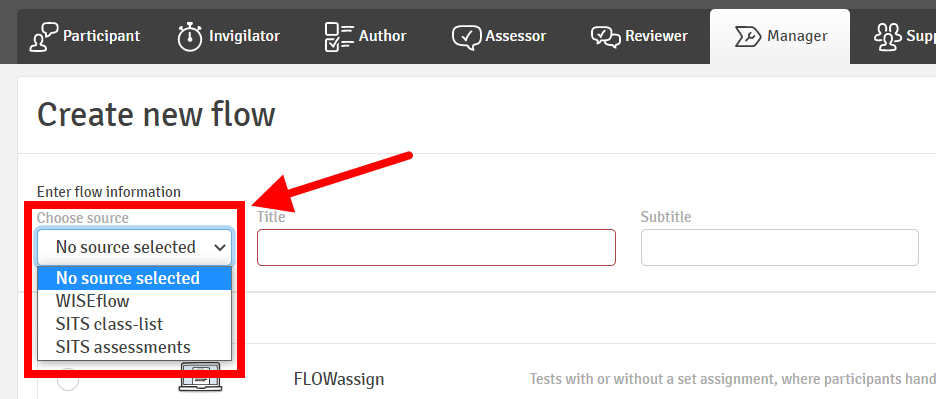
If you choose "SITS class list" or "SITS assessments" (if using SITS assessments, make sure you select the "Choose from list" option!) you will need to enter the following information:

  • Module code with suffix (e.g. CS1004_CN, not just CS1004)
  • Academic year (if you are pulling information for the current academic year this can be left alone)
  • Occurrence (this is normally "A" for students attending lectures and seminars but may be "D" for distance learners, a variation of "OL" for online courses, etc.)
  • PSL code (this reflects the time of year in which the module is taught and can be double checked in the "Prd" field in the SMR screen in SITS)
  • RESIT (this should be "FALSE" where students are not resitting, or "TRUE" where students are resitting, whether as first attempt or not)

Click the blue "Request source data" button and this should return the results (if "SITS assessments" is in use then you will additionally need to choose a specific element of assessment). You can then continue on to choosing a flow type and creating the flow. The students will be brought on automatically at the point of creation. You can continue to add additional source data (e.g. resit students) after the flow has been created.

If you receive the error message "Missing or invalid data" when requesting source data, check that the information you've entered is correct. If it is, then contact WISEflowHelp@brunel.ac.uk to report the error in the first instance.

Adding a source to an existing flow

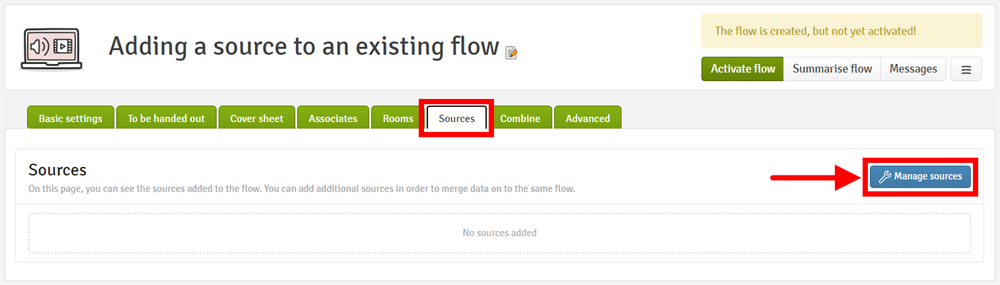
The two SITS sources can still be added to a flow after it's been created by going to the "Sources" tab on the flow and clicking the blue "Manage sources" button:

add sources after

Simply enter the information and retrieve the information as listed above in Adding a source when creating a flow and then click "Add":

add sources after 2

You will find that you can continue to enter more information and add multiple sources to a flow in this way, which is useful when you have lots of students resitting a module in different academic years or when you are dealing with an assignment that is taken across multiple different modules and wish to manage this in a single flow. 

Adding source data to a flow after it's created doesn't add students to a flow immediately. Instead this process occurs automatically overnight. However, if you don't have time to wait for this process to happen, you can return to the flow page and click "Synchronise with SIS" in the upper right to trigger the process immediately:

add sources after 3

Important: SITS-based sources must be added to a flow before the flow's participation period ends, WISEflow's integration with SITS will not work beyond this date/ time. If students need to be added to a flow once the participation period has ended, this can still be done manually. See Adding students manually for more information. 

Tip: when adding SITS source information using either method, you may see a warning that there are invalid users:

invalid users

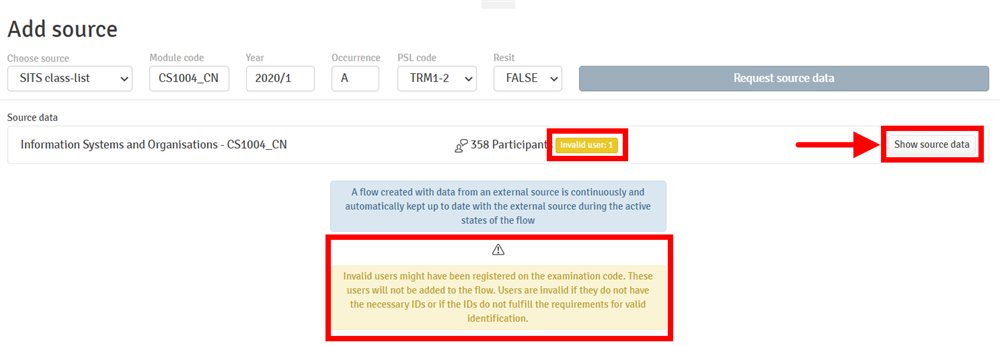
You can click on "Show source data" to view a list of students that are going to be added to the flow and check the details of the invalid users. These will usually be students that have not completed enrollment yet, but if there are any other reasons that WISEflow does not consider the user valid, they may need to be added to the flow manually. 

Checking SITS source information

If you are unsure of all the details of a SITS source, i.e. you don't know what the occurrence or the PSL code is, the best place to check this is the SMR screen in SITS (note that here the PSL code can be found in the "Prd" field).

If you don't have access to SITS, you can instead navigate to the "Reports" tab in eVision and look up this information using the Module Availability Data report (found in the "Colleges Operational" category).  

Adding students manually

 While it is generally recommended that student data should always be added to a flow via WISEflow's source integration with SITS (see Adding sources or Source Types), sometimes students must be added in manually. You can add students one at a time, or in a batch if you have a spreadsheet or comma separated file with their details. 

Adding individual students manually

Click on "+Add participants" and simply search for the relevant student by name or ID number. Click the green + button on the right to add them to the flow:

add stus manually

add stus manually 2

Adding a batch of students manually

This option can be used where you have a spreadsheet or comma separated file of student email addresses. Click on "+Add participants" and select the option to add "Several at a time". Paste in all of the data and WISEflow will pick up all students with a valid account:

add stus manually 3

Note: SITS-based source information can still be added to a flow retroactively, as long as the student submission deadline (participation period) has not ended. See Adding sources for more information and read Adding a source to an existing flow in particular. 

Alternative Grades

Where students do not submit on a flow, please note that a flow manager is able to administratively register a 'Non-submission' against the record, and in turn, the result will be fed back into SITS via the grade export functionality.

To record a 'Non-submission' on a flow, please locate the student on the respective flow via the 'Final Grade' tab that forms part of the 'Participants' section and select the appropriate variant from the 'Alternative grade' column.

Please note:

  • For modules which are set up in SITS to only accept grades, NS - NS (non-submission) should be used
  • For modules which are set up in SITS to only accepts marks, 0 - NS (non-submission) should be used

It is important to ensure that the correct variant is used that matches how the module is set up in SITS. In the event that the incorrect variant is used, the result will fail during the export but will become locked, meaning that a flow manager will be unable to change the selection and would require assistance from UNIwise, which would be at a cost to the respective area.


'An error occurred!' while trying to access the Flow (Supporter only)

supporter error message

This message usually pops up when a user with lower access privilege searches for flows to view them, unless the user is a manager of the flow or has higher level of access than the current manager, such error message will always pop up.

Archives/ Finding old flows

One month after the assessment period has ended, flows in the "Concluding" phase of your overview are automatically archived so that the overview remains current and up to date. Past flows can always be accessed via the "Archive" button in the upper right:

manager archive

As the Manager of a flow, you can also choose to archive flows early as long as the assessment period has ended (this includes individual assessment deadlines). To do this, open the flow, click the burger button in the upper right and select the "End flow" option:

archive a flow

Changes can no longer be made to archived flows. If any amendments are needed after a flow has been sent to archive, you will need to reopen the flow first. See Reopening past flows for more information.  

Assessment and review settings

In addition to adding Assessors, Reviewer and rubrics to a flow, a number of other settings can be accessed by clicking "Manage settings" from the "Assessment and review" panel:

Assess review manage settings

An image of the menu that appears after "Manage settings" is clicked on the "Assessment and review" panel.

The available settings are as follows:

  • Procedure for submitting final assessments - this is set to "Agreement between co-assessors" by default, meaning that the Assessors are responsible for finalising their grades. This setting can alternatively be changed to "Approval by reviewer", meaning that Assessors will still enter and submit their grades as normal but a Reviewer must agree to finalise them (note: you will have to appoint a specific Reviewer and grant them additional permissions on the flow where this is in use). 
  • Submission of assessment - this is enabled by default and means that Assessors are required to enter and submit grades by the end of the assessment period for any work submitted by students. This setting may be switched off for formative flows, where grading is not required.
  • Show final assessment - enabling this setting will ensure that grades are automatically released along with feedback at the end of the assessment period (note: feedback will be released to any students with submitted grades regardless of whether this setting is enabled or not). Once activated, you can additionally set an optional publication date for the release of grades and feedback. 
  • Enable similarity control - available on FLOWassign and FLOWlock type flows only. This is enabled by default, switching this setting off will mean that student submissions are no longer automatically text matched for detection of potential plagiarism. 

Copying flows

Note: you can only copy flows of the same type, e.g. you cannot copy a FLOWassign type flow and turn this into a FLOWmulti one. If you require a flow of a different type, you will need to create this from scratch. 

Copying a flow is a useful way to rapidly create an assignment with the same overall settings, students, markers, marker allocations, etc. which can be faster and more convenient than building a new flow from scratch when something very similar already exists. 

You can either do this by going to the flow creation page, selecting "WISEflow" as the source and then clicking "Choose from list" to pick this from a list of other flows you have Manager access to:

create flow wiseflow

Or you can select the flow you'd like to copy from your Manager overview and then click the burger button in the upper right of the main flow page and select the "Create a copy of the flow" option:

copy flow 2

Either method will then give you the options to change the title/ subtitle of the new flow you are going to create, as well as giving you various options for what information you'd like to copy across:

copy flow 3

Important: Copying students from an existing flow does not copy across any integration with SITS that might have been on the original flow (i.e. it will be as though the students have been added manually to your newly copied flow). If you want to be able to send grades back to SITS or have the flow automatically update overnight to check for any newly enrolled students, you will need to add an appropriate SITS source to your copied flow. See Adding sources for more information. 

Cover sheets

By default, WISEflow automatically populates a cover sheet for every student submission with details such as the student's ID number, the title of the assignment and the date and time that the student handed in their work. You can add extra fields to be completed by the student via the "Cover sheet" tab:

cover sheet 2

Depending on your College's practice, there may already be guidance for custom cover sheet fields which should be added to all flows. 

Clicking "Manage custom fields" will bring up a menu which allows you to search for and add various additional fields to the flow's cover sheet (pressing space in the search field will bring up a list of all possible options) Any fields which are mandatory will be denoted by an asterisk (*), meaning that the student must complete these fields before WISEflow will permit them to hand in their work:

cover sheet 3

Click the + symbol to add a custom field to the existing cover sheet, and click the heart symbol to add a specific field to your favourites. Adding a field to your favourites will remove the need to search for it in future - instead you can add this directly from the "Favourites" tab on the mini menu which is useful if you will be using the field frequently. Click "Save" to finish.

Creating the flow

A "flow" is WISEflow's terminology for a coursework assignment or an examination. It is a single area in WISEflow where students can submit work, academics can mark and moderate, and users with Manager permissions can oversee and manage administration. You can make a new flow by clicking the green "Create" button in the upper right:

An image showing the green "Create" button highlighted in the upper right corner of WISEflow

Clicking the burger button to the immediate right will additionally give you the option to create a new FLOWseries or FLOWcombine, which are both methods of handling e-portfolio work or continuous assessments in WISEflow.

When creating a flow there are several points to consider, including:

  • Choosing a source of information to add students to the flow
  • Choosing the appropriate flow type
  • Setting deadlines for students, markers and moderators
  • Adding markers and moderators, plus setting up marker allocation
  • Adding and distributing assignments/ exam papers
  • Any additional settings that may need to be enabled

Your College may already have guidance or best practice outlines which cover a number of these topics, and you may also find some of the other sections on this page helpful. 

Deadlines

The "Deadlines" panel contains 4 sets of dates and times. The first two are for students, and the remaining dates are for academics:

deadlines

Start of participation period: the earliest possible date/ time that students can access the coursework brief or exam paper and upload and hand in their work.

End of participation period: the deadline by which students must have submitted their work. If the late hand in setting has been enabled, students may still submit beyond this date/ time but will be subject to capped grades.

Start of assessment period: the earliest possible date/ time that academics can access submitted scripts to deliver feedback and enter/ submit grades. An additional setting can be enabled to allow academics to access student submissions early, however this will prevent students from being able to withdraw and change their submissions by themselves. 

End of assessment period: the deadline by which academics must have completed marking and moderation. Beyond this date, academics will no longer be able to submit grades, and feedback will be automatically released to students unless an optional publication date has been specified. 

To change any of these dates/ times, simply click on the calendar icon next to the appropriate start/ end period and select the new desired date/ time:

deadlines 2

Student submission deadlines and assessment deadlines can also be changed on an individual basis in the "Participants" section at the bottom of the flow page. 

Individual student deadlines (to give the student longer to hand in their work) can be extended under the "Basic information" tab:

deadlines 3

Individual assessment deadlines (to give the marker longer to look at the student's work) can be extended under the "Participant details" tab:

deadlines 4

Note: If a deadline is changed when a flow is activated, the relevant user will receive an automated email notifying them of the change. 

Exam settings

There are a number of settings that can be adjusted on exam flows, depending on which flow type is in use. Some settings can be accessed from the "Participation" panel on the flow page:

An image of the participation/ exam settings found on a FLOWlock or FLOWmulti type flow.

Additional settings can be accessed by clicking "All participation settings". Some of the most frequently used settings include:

Commonly used participation settings for exams
Setting Explanation 
Use the FLOWlock browser Available on FLOWlock and FLOWmulti type flows. This setting is enabled by default and requires students to download and install the lockdown browser in order to participate in the examination. It may need to be disabled for remote exams and/ or exams with a duration of several days. Can be set generally or at an individual level.
Participant password Available on FLOWlock and FLOWmulti type flows. Requires students to enter a password to access the exam paper. Where passwords are in use during official exam periods, these will be provided to you by the Examinations team. If no password is set, students will be able to access the exam upon launching it.
Invigilator password Available on FLOWlock and FLOWmulti type flows. Requires students to enter a password to exit the exam without handing in, or to access the exam late. Where passwords are in use during official exam periods, these will be provided to you by the Examinations team. An invigilator password must be set if the lockdown browser is in use. 
Individually timed flow duration Available on FLOWassign, FLOWhandin, FLOWlock and FLOWmulti type flows. This gives the student a set time limit to complete a submission from the time that they begin, within the parameters of the participant start and end dates. E.g. the student can start the flow any time between 01/04/2021 and 10/04/2021, but when they start the flow they only have 2 hours to complete the task and submit their work. Can be set generally or at an individual level to accommmodate students with extra time requirements. 
Allow the participant to access paper after hand-in/ No access to paper after hand-in Available on FLOWlock and FLOWmulti type flows. By default, students are not able to access their answers to an exam after submitting them (meaning the settings are disabled/ enabled respectively). Note that if students are not permitted to access their answers after handing in but an academic chooses to share feedback via annotations on an exam paper, this will override the setting once the end of the assessment period is reached. 
Enable facial recognition Available on FLOWlock and FLOWmulti type flows where the lockdown browser is in use. This setting requires students to verify their identity via webcam before starting the examination and will continue to verify the student's identity throughout the exam. Can be set generally or at an individual level.
Skip invigilator password at hand-in Available on FLOWlock and FLOWmulti type flows. Where an invigilator password has been set, enabling this option will allow the student to submit their work and end the exam without entering a password (thus giving students the capability to hand in early in a locked down examination). Students will still be required to enter the invigilator password if they try to exit the exam without handing in. 
External internet resources Available on FLOWlock and FLOWmulti type flows where the lockdown browser is in use. Normally students cannot access the internet from their device during a locked down exam. This setting allows students to access specified websites. Can be set generally and/ or at an individual level.
Allowed appendix tools Available on FLOWlock and FLOWmulti type flows where the lockdown browser is in use. This setting allows students to supplement their answers with drawings and diagrams, additional files, code or formulae depending on which tools are permitted. In FLOWlock flows the tools are accessible at all times via the "Appendix manager" button. In FLOWmulti flows, this button will only appear on sections of the exam which have an appropriate question type (i.e. students cannot supplement answers to multiple choice questions a diagram, but this would make sense for an essay type question). 
Allow participant to verify answer to the question Available on FLOWmulti type flows only. If the Author of the exam paper has included the ability for students to check whether the answer to the question is correct, this setting must be additionally activated at Manager level in order to allow students to do this. 
Allow the participant to access achieved points after the assessment period Available on FLOWmulti type flows only. Enabling this setting will let the student see their score on the exam plus a breakdown of all the points achieved. This information will only be shown to students once the assessment period has ended. 


Flow types

Different flow types that you may encounter on WISEflow
FLOWassign icon   FLOWassign

The most common flow type used for coursework submission. Focused on written/ typed submissions such as essays and reports. Accepts a PDF file only for the main upload, but other files can be attached as appendix material if this is permitted.

The main submission will appear in the middle of the Assessor tool, and appendix material can be viewed/ downloaded separately. This flow type also generates similarity reports via URKUND (now called Ouriginal). See the WISEflow for markers FAQ or WISEflow for moderators FAQ for more information on using URKUND/ Ouriginal.

 FLOWattend icon  FLOWattend

 A flow that can be used for attendance based modules such as placements. There will not be any digital submissions to look at on this flow, but you can still provide grades and feedback here.

Students may still have provided a physical submission (e.g. a performance or a product prototype).

 FLOWhandin icon  FLOWhandin

 A flow for coursework submissions which are not primarily written (e.g. PowerPoint slides, a video diary or a game prototype). This will accept any file type whatsoever. 

Work submitted on this flow will appear as a list of files which can be previewed if they are in a compatible format (e.g. PDF, MP4, JPEG) or downloaded for offline review. Academics will not be able to use annotation tools to deliver feedback in this flow type, but can still provide comments or use a rubric. 

 FLOWlock icon  FLOWlock

 A flow type used for secure, typed essay style examinations. Students will need the LockDown browser will need to be downloaded and installed before taking a FLOWlock exam. 

Like FLOWassign coursework, the submitted scripts will appear as PDFs in the middle of the Assessor tool for marking and URKUND/ Ouriginal similarity reports are generated for these. Any appendix material the student has provided can be viewed/ downloaded separately. 

FLOWmulti iconFLOWmulti lockdown icon FLOWmulti

A flow type used for exams which contain multiple choice or interactive questions. If there is a padlock symbol on this icon, students will need to have the LockDown browser installed on their device in order to take the exam. 

Many question types can be scored automatically and this flow type still supports the use of essay type questions as well. It also provides statistics/ data analytics which can be downloaded for further use offline. 

Group settings

There are two types of group setting that can be applied to a flow. Group settings can be accessed via the "Details" panel:

group settings

Group paper: one student can submit on behalf of their entire group, the Assessor must deliver grades and feedback to groups as a whole (i.e. Group 1 gets an A+, Group 2 gets a C).

Individual papers: each group member must submit something, the Assessor must deliver grades and feedback to individual group members (i.e. within Group 1 - Student A performed well and gets an A+, Student B contributed less and gets a C).

Important: group settings must be determined before a flow is activated. Once a flow has been activated, this setting cannot be changed. 

How to download a list of grades/ submission dates

Staff that have Manager access to a flow can export an Excel compatible spreadsheet of all of the submitted grades. This spreadsheet can also be used to check submission dates and times for capping late submissions

On the main flow page, scroll down to the Participants section and click Tools > Export assessments:

export assessments

This will take you to a screen which shows a full list of all the students and their submitted grades. Clicking "Export filtration to file" will reveal an option to export this information as a spreadsheet:

export assessments excel

Note: the "Hand in date" column refers to the date and time that students submitted their work; the "Date of submission" column actually refers to the date and time that academics submitted their grades.

How to replace/ update a source

If an element of assessment has its assessment pattern changed by Awarding, the "SITS assessments" source will need to be updated where this is in use on an active flow otherwise the grades won't be sent back to SITS. 

Important: this can only be done if the participation period/ submission deadline for students hasn't passed. WISEflow's integration with SITS won't work beyond this date/ time. If the assessment pattern has been changed after the participation period ended, grades will have to be entered into SITS manually.  

Add the new source first. On the main flow page, click the "Sources" tab, and onn the screen that follows click the blue "Manage sources" button:

add sources after

From here, select "SITS assessments" as the source and then "Choose from list". Enter the details as you would if you were creating the flow for the first time. These should include:

  • Module code (including suffix)
  • Academic year
  • Occurrence code (e.g. "A" for full time, on campus students, "D" for distance learners)
  • PSL code (this can be checked in the "Prd" field in the SMR screen on SITS)
  • Resit (FALSE if the module is in SAS on SITS, TRUE if the module is in RAS)

You'll then be able to select the appropriate element of assessment:

Click "Add" to finish adding the source:

add sources after 2

Once the new source has been added, return to the main flow page and click "Synchronise with SIS":

add sources after 3

Once synchronisation has been successful, return to the "Sources" page and delete the old source:

replace source

Missing 'assessment' tab/ changing assessment settings

By default, the "Submission of assessment" option in WISEflow is always enabled. This means that academics are expected to enter and submit grades for assignments. There may be times when academics don't need to submit grades, e.g. if the assignment is formative and students only need to receive feedback. 

If you are creating a flow where grades (or marks) do not need to be entered, the "Submission of assessment" setting should be disabled. You can access this option from the "Assessment and review" panel by clicking "Manage settings":

Assess review manage settings

submission of assessment

Note: as a consequence of disabling this setting, the "Assessment" tab in the "Participants" section and the "Export assessments" option will no longer be available:

assessment tab missing

If these are needed at any point, the setting can be temporarily reinstated.

Reopening flows

An archived flow can be reopened by accessing the flow and selecting this option from the burger button in the upper right:

reopen a flow

Note: before reopening a flow, make a note of the end of the assessment period as WISEflow will change this to the current date as a condition of bringing this out of archive. Once you have made the necessary changes to the flow, the global assessment end date/ time should be set back to what it was for accurate record keeping (assuming you have not extended any individual deadlines, this action will also return the flow to archive). 

Section based marking (FLOWmulti only)

By default, Assessors are allocated to students on a flow; however, with section based marking you can instead allocate Assessors to a specific section of a FLOWmulti exam paper. This can be a really useful way to divide marking on large exams, as long as the questions that each marker will be looking at are contained within a single section of the exam. 

To set up section based marking, click "Manage settings" under the "Assessment and review" panel: 

Assess review manage settings

On the screen that follows, ensure that the "Section based assessment" setting is enabled:

section based assessment setting

You will then see an additional "Manage matrix" button in the "Assessment and review" panel:

The manage matrix button

Note: if you haven't added the Assessors in yet, you can also reach this screen from the "Manage assessors" page by clicking "Section based assessment setup" in the "Work distribution" table. 

On the "Manage matrix" page, if the exam contains any automatically scored multiple choice sections or other sections that don't need to be manually marked, you can deactivate these to indicate that they don't need any user input (any automatic scores will still be included in the student's overall score/ grade for the exam):

deactivate sections in section based assessment


Much like the usual allocation matrix, you can also click in a cell where the relevant Assessor's name and the appropriate section intersect to allocate marking:

allocate markers in section based assessment

If multiple Assessors are allocated to a section, the workload will automatically be split between them evenly (e.g. 50% each). Make sure you click "Save setup" afterwards to save any changes. If distribution needs to change while marking is underway, the "Transfer sections" feature should be used - see Section based marking (FLOWmulti only) in the Module Leads and Authors FAQ for more information. 

Important: if the exam features any optional questions (e.g. students are expected to choose 1 of 2 questions in a section), the maximum achievable points for the exam paper may need to be manually adjusted so that grades can be calculated accurately. This can only be done once the exam paper has been attached to the flow and it must be done before the assessment period begins:

adjust achievable points in section based assessment

Sending grades back to SITS

Once the assessment period has ended, submitted grades can be sent from WISEflow back into SITS as long as the "SITS assessments" source type was added to the flow. If the "SITS assessments" integration was not used as the source then grades will need to be entered into SITS manually.

To send grades back, click Tools > Export assessments:

export assessments

On the screen that follows, if grades can be sent back there will be a green "Export assessments to external system" button:

An image of the export screen with the green button used to send grades back to SITS highlighted.

Click the button, tick the box and click "Proceed" on the warning prompt that appears and the grades will then be queued for export. You can click "Update" or refresh the webpage to see how this is progressing, but the export will carry on automatically while you perform other tasks. Depending on the size of the cohort, grades should show as being successfully exported after a few minutes have passed. Failed exports will also be noted:

An image showing that 1 grade has failed to be exported from WISEflow to SITS. Users can click on the number in the "Failed" column to produce a filtered list of any grades that failed to be sent across.

If a grade has failed to export, this could be for several reasons:

  • The grade type is not recognised by SITS (this should not happen if the assessment type in the "Details" panel has not been changed)
  • There has been a change to the module's assessment pattern mid-year and the source information was not updated after this took place
  • The grades have already been exported from WISEflow once (it is not possible to overwrite existing grades in SITS from WISEflow)

In any of these scenarios, the grades will need to be entered manually instead. If the reason for the failed export is not apparent, contact WISEflowhelp@brunel.ac.uk and report the issue. 

Note: If individual assessment deadlines are preventing you from sending grades back, these can temporarily be amended to a date in the past as a workaround. The deadlines can then be set back to the correct date and any subsequently submitted grades can still be sent through once this date has passed. 

Setting up for blind review flows

When setting up WISEflow for blind reviews there are possible and potential scenarios that can happen. These include:

  • discrepancy between the 1st marker and 2nd marker’s grades
  • double blind marking and on whether the two markers can know it is a double blind marking     

In the event managers will deal with the above type of scenario, it is to know that there are two main stages when marking in WiseFlow:

  1. Registering (entering marks, also called registering – after registering, the mark can be changed by the person who entered it)
  2. Submitting (clicking a button to submit the registered mark – after submitting, the mark cannot be changed by anyone, unless the manager unpicks it and then, the person who entered it, has to register the new mark and submit again)

When blind marking is in place, the markers:

  1. Register the mark
  2. But when they go to submit the mark, unless they submit the same mark, the system will not accept a submission from either of them. They will see an error that looks like this: (the message reads “The assessment is not equal to assessment submitted by the co-assessor(s). When consensus on the assessment has been reached, all assessors will need to register the assessment again”)
  1. Blind flows

So, after 1. Registering, they should meet and discuss their mark, and agree on one mark, then both of them individually need to 1. Register that agreed mark and 2. Submit that agreed mark.

On the other hand, two markers can know that it is double-blind marking on WiseFlow, when there are two or more assessors allocated to the same student: two or more green blobs against the same students.

More so, markers will be able to see who else is marking the same submission by clicking on the Co-assessors button and see other assessors that are marking each student as shown in the screengrab below:

Blind flow screenshot

In the above screenshot, the assessor who opened this screen and Simon Kent have been assigned to mark student number 1.

It is considered a good practice to give each assessor a list of who is marking whom (in a word or excel format) so that they can organize discussing the mark with their co-assessor for each student, before submitting their grade. The reason is before submitting, they (the markers) need to discuss and come to an agreement on the mark.

Source types

When you first create a flow, there are four different source types to choose from:

create flow sources

No source selected: you must give the flow a title and can either add students to the flow manually or add a different source of information later on.

WISEflow: copy data from an existing flow that you have Manager access to. In addition to adding students to a flow, this source type will also allow you to copy various settings, deadlines and staff members. See Copying a flow for more information. 

SITS class list: retrieve data from the student database (SITS), this will allow you to add all students taking a specific module and is useful when setting up formative flows.

SITS assessments: retrieve data from the student database (SITS), this will allow you to add all students taking a specific element of assessment on a module and is normally used for summative flows. Using this source will allow you to send grades back to SITS instead of having to enter them manually. 

Titles and subtitles

If using "No source selected" when creating a flow, you must enter a title yourself. When you choose a source of information while creating your flow, a title will automatically be entered for you. In both scenarios, you can also optionally add a subtitle. Whichever method you choose, you can still change a title or subtitle after creating a flow by clicking the edit icon as shown:

edit title

edit title 2

Depending on which College you are affiliated with, there may be a specific naming convention for flows that needs to be followed. Additionally, when setting up flows for exams taking place during the examinations periods, subtitles should contain this specific wording:

  • May Exam [academic year] (replace the square brackets with the appropriate year, e.g. "May Exam 2020/1")
  • Aug Resit [academic year]
  • Winter Exam [academic year]

Subtitles are an excellent way of making sure that you can search for a specific category of flows and return results for these quickly. 

Unable to add member of staff to flow

If you can't find a member of staff when trying to add them to a flow, it may be the case that their account has not yet been created or doesn't have the correct permissions. Contact WISEflowhelp@brunel.ac.uk for assistance and the team will be able to check or create the account as needed.

Alternatively, if you have Extended Supporter permissions, you will be able to set up the new account, see Creating user accounts for more information. 

Unpicking a submitted grade

Once a grade has been submitted for a student, it will appear in the list of paricipants under the "Assessment" tab:

The Manager view of submitted grades on a flow.

At this stage, grades cannot be changed without Manager intervention. If a grade needs to be changed after it has been submitted, you can unpick it by clicking on the rosette symbol next to the specific grade:

The Manager view of submitted grades. A rosette icon is highlighted to show that this can be selected to unpick a grade.

Tick the box and click "Proceed" on the warning prompt that follows, and this will return the grade to an editable state. The grade can then be amended and re-submitted as long as the assessment deadline has not been reached. If the assessment deadline has passed, you will additionally need to extend this - see Deadlines for more information. 

What can I do if a student requests details of their originality check report?

It is Brunel’s policy that the outcome of similarity checking is not normally shown to the students at any point. The policy in full can be accessed here

However, if a research candidate wants a copy of the originality report from the CheckIt process, they should discuss this with their principal supervisor.